Table of Contents
Outlook to iOS Sync - Settings
OutlookDAV
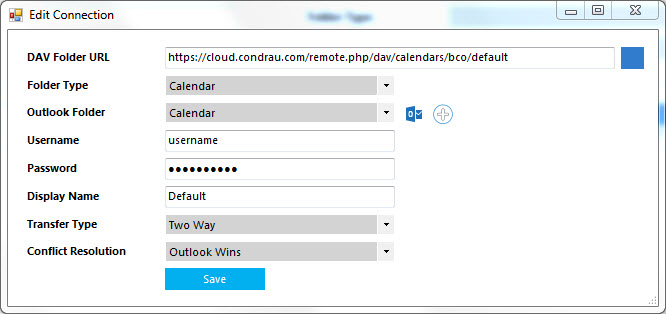
- Open OutlookDAV and create or modify one connections for the calendar and one for the address book.
- DAV Folder URL: enter the URL to your DAV server. For an ownCloud server, see below.
- Choose Folder Type and select the Outlook Folder, e.g. the name of the calendar or address book in outlook.
- Enter Username and Password to access the cloud server.
- Enter the Transfer Type. For the first sync select One-Way:Upload to remote server, if your valid data is in Outlook, or One-Way: Download from remote server, if your valid data is in the iDevice.
- Change it to Two-Way after the first successful sync.
- Accordingly, set Conflict Resolution to which device should get preference.
ownCloud 9
Login to your ownCloud server as <user> and check the default calendar and address book. Click on the link symbol to check the sync path to be entered in the Outlook settings. The paths default to:
- Calendar URL:
https://my.server.com/remote.php/dav/calendars/owncloud_user/default
- Address book URL:
http://my.server.com/remote.php/dav/addressbooks/users/owncloud_user/default
ownCloud 7 and 8
Login to your ownCloud server as <user> and check the default calendar and address book. Click on the link symbol to check the sync path to be entered in the Outlook settings. The paths default to:
- Calendar URL:
https://my.server.com/remote.php/caldav/calendars/owncloud_user/personal
- Address book URL:
http://my.server.com/remote.php/carddav/addressbooks/owncloud_user/contacts
iOS device
Calendar
- Open the settings application.
- Select Mail, Contacts, Calendars.
- Select Add Account.
- Select Other as account type.
- Select Add CalDAV account.
- For server, type
https://my.server.com/remote.php/caldav/principals/username
- Enter your user name and password.
- Select Next.
Your calendar will now be visible in the Calendar application
Address book
- Open the settings application.
- Select Mail, Contacts, Calendars.
- Select Add Account.
- Select Other as account type.
- Select Add CardDAV account.
- For server, type
https://my.server.com/remote.php/carddav/principals/username
- Enter your user name and password.
- Select Next.
See iOS - Synchronize iPhone/iPad
If you are replacing the current address book with the one you synced to ownCloud from Outlook, consider to delete the address book before syncing, otherwise you might end up with duplicated contact entries. Here are the necessary steps:
- Check first whether you created any contact entries on the phone which were not synced back to Outlook before. iContacts+ can help you with this as it allows to sort all contacts by creation date, youngest item first.
- Go to Settings –> Mail, Contacts, Calendars and make sure that all accounts' Contacts sync is off, including the account created to sync with the ownCloud server. Disabling Contact sync from mail accounts will prompt the iPhone to ask whether you want to remove the contacts from the phone.
- Go to Settings –> iCloud and disable Contacts sync. This will prompt the iPhone to ask whether you want to remove the contacts from the phone.
- If Contacts sync was disabled in iCloud, enable it first and allow some time to sync the contacts to the cloud. After that, disable it again and proceed as described before.
- Now that all contacts are removed from the phone, go back to Settings –> Mail, Contacts, Calendars and enable Contacts sync for the ownCloud server.
If you are replacing the calendar on the phone with a new calendar on the server, do not change the sync settings on the phone. Delete the address book on the server on make sure the sync settings on the computer are set to one-way (Outlook to Server).


