Table of Contents
Outlook
Migrate POP3 email
- Move or copy .pst folder to \local\path
- Setup new email address from within Outlook (File → Account Settings) and select the .pst file when setting up the email manually
- Do not use the \default\path (which is My Documents\Outlook Files) as \local\path, as you might run into unknown errors if doing so
Default mail settings
<html> <table class=“table-slist”>
<tr> <td style="width: 35%;"> <h2>Default Ports:</h2> </td> <td style="width: 35%;">Server:</td> <td style="width: 15%;">Authentication:</td> <td style="width: 15%;">Port:</td> </tr> <tr> <td>SMTP Server (Outgoing Messages)</td> <td>Non-Encrypted</td> <td>AUTH</td> <td>25 (or 587)</td> </tr> <tr> <td> </td> <td>Secure (TLS)</td> <td>StartTLS</td> <td>587</td> </tr> <tr> <td> </td> <td>Secure (SSL)</td> <td>SSL</td> <td>465</td> </tr> <tr> <td>POP3 Server (Incoming Messages)</td> <td>Non-Encrypted</td> <td>AUTH</td> <td>110</td> </tr> <tr> <td> </td> <td>Secure (SSL)</td> <td>SSL</td> <td>995</td> </tr> </table>
</html> A List of SMTP and POP3 Server
Yahoo mail settings
Incoming Mail (POP) Server - Requires SSL
  Server - pop.mail.yahoo.com
  Port - 995
  Requires SSL - Yes
Outgoing Mail (SMTP) Server - Requires TLS
  Server - smtp.mail.yahoo.com
  Port - 465 or 587
  Requires SSL - Yes
  Requires authentication - Yes
If your POP client doesn't offer TLS, you'll still be able to use SSL.
Login info - Requires authentication
  Email address - Your full email address (name@domain.com.)
  Password - Your account's password.
Gmail settings
Clean up mailbox
Delete large attachments in Calendar items
- Select the View tab.
- Press Change View.
- From the gallery that pops-up choose: List
- Press the Add Columns button.
- Set the “Select available columns from:” to All Appointment fields
- In the left columns select: Size
- Press “Add→”, then “OK” to return to your Calendar.
- Press the added “Size” columns to sort by size.
Once done, you can switch back to the Day/Week/Month view via Change View→ Calendar
- Note 1: After deleting a lot of data, you might want to compact your pst- or ost-file afterwards to also actually free up some disk space immediately.
- Note 2: If you have a lot of items with attachments and you only want to delete the attachments or store them outside of Outlook, then you can speed up or even automate this process by using an attachment stripping/saving add-in.
For instance; Attachment Save from Sperry Software. If you decide to order use BH93RF24 to get a discount. Deleting large Calendar items
Change Address Book sort criteria
Sub FileAs()
(Outlook 2003) Dim oFolder As MAPIFolder
(Outlook 2007) Dim oFolder As Folder
Set oFolder = Session.PickFolder
If oFolder Is Nothing Then Exit Sub
For Each Item In oFolder.Items
Dim oContact As ContactItem
Set oContact = Item
If Not oContact Is Nothing Then
If oContact.FirstName = "" Then
oContact.FileAs = oContact.LastName
ElseIf oContact.LastName = "" Then
oContact.FileAs = oContact.FirstName
ElseIf oContact.LastName <> "" Then
oContact.FileAs = oContact.FirstName & ", " & oContact.LastName
End If
oContact.Save
Set oContact = Nothing
End If
Next
End Sub
reset Outlook folder names to default language of the client
Outlook /ResetFolderNames
Start Outlook as Administrator
Hold Ctrl-Shift when clicking the Outlook icon.
Delete or archive older calendar items
Over time, all of your saved calendar items might add up to a large number and occupy a large amount of space in your data file. To free some of this space, you can reduce the number of saved items by archiving or deleting them.
Archive your calendar items
The archive process deletes items from your data file after first making a backup of the items in another Outlook data file.
- Click the File tab.
- Under Mailbox Cleanup, click Cleanup Tools.
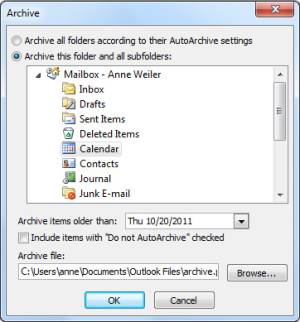
- Click Archive.
- Note: Some organizations turn off the ability for users to create Outlook Data Files (.pst) which are used for archiving items. If you do not see Archive command, your organization may have turned this feature off.
- Click Archive this folder and all subfolders.
- If you created additional calendars, selecting this setting will archive items from those calendars as well.
- In the folder list, click Calendar.
- In the Archive items older than list, select the date that you want. To archive everything, select a date in the future.
- If you want, select the Include items with “Do not AutoArchive” checked check box.
- Selecting this check box will archive everything, including items that you marked as exceptions to AutoArchive.
- You can accept the file location where the archive file will be saved, or you can browse to a different folder and provide the file name of your choice.
- Note: We recommend that you make a note of this location so that you can easily find the archive file later.
- Click OK.
- The archiving process begins. When you return to the main Outlook view by clicking the Home tab, the Outlook status bar indicates that the archive is in progress.
- To cancel the archive in progress, click Archiving stop button. Any items that were already archived up to that point will remain in the archive file.
Delete all items on your calendar
The process of deleting removes all the items from your data file without making a backup.
Warning: The following steps will delete all items in your calendar, including holidays that are automatically added to the calendar. You can replace default Outlook holidays that are deleted during these steps, but all other calendar items will be permanently deleted.
- In the Navigation Pane, click Calendar.
- On the View tab, in the Current View group, click Change View, and then click List.
- Click in the item list, and then press CTRL+A.
- All items in the list should now be selected.
- Press DELETE.
Trouble shoot Outlook calendars
There is a great command line tool to trouble shoot your calendar.


