Table of Contents
KMIP for key management
- Follow the guide to install KMIP on a Synology NAS server and client
Certificates
- The default, out-of-the-box self-signed Synology certificate will fail on DSM 7.4 and later, which hardened the certificate requirements. You will generate matching certificates from an official Synology script, which will be installed alongside the default certificates, and are valid for 10 years. These certificates also work for Synology clients connecting to a KMIP Server (PyKMIP) not hosted on a synology NAS.
- Login to your NAS on the command line with SSH and elevate to root
- Download Synology's official KMIP certificate script:
wget supweb.synology.com/support_web/kc_tool/how_to_gen_cert_for_kmip_services/gen_kmip_certs.sh
- Run the script as root:
bash gen_kmip_certs.sh kmip_certs
The second parameter kmip_certs is the name of a shared folder the script will create to store the certificates
- Upload the generated scripts in
/volume1/kmip_certsto your local computer you use to access your DSMs through your web browser, after which you can remove the shared folder and it's content - The script will generate the following certificates:
ca-key.pem
ca.pem
client-fullchain.pem
client-key.pem
client.pem
server-fullchain.pem
server-key.pem
server.pem
DSM as Server
- go to Control Panel > Security > Certificate
- Click Add, choose Import Certificate, and upload:
- Private key:
server-key.pem - Certificate:
server.pem - Leave Intermediate certificate empty
- Click Settings (in the Certificate tab), find the KMIP dropdown menu, select this new server certificate, and click OK
- Go to Control Panel > Security > KMIP and select Set as remote key server
- Under Manage Client Connection, click Manage > Add
- Upload the client files you generated:
- Client certificate:
client.pem - Certificate authority:
ca.pem
- Add a port forward for port 5696 to your server NAS
DSM as Client
- go to Control Panel > Security > Certificate
- Click Add, choose Import Certificate, and upload:
- Private key:
client-key.pem - Certificate:
client.pem - Leave Intermediate certificate empty
- Click Settings (in the Certificate tab), find the KMIP dropdown menu, select this new client certificate, and click OK
- Go to Control Panel > Security > KMIP and select Set as remote key client
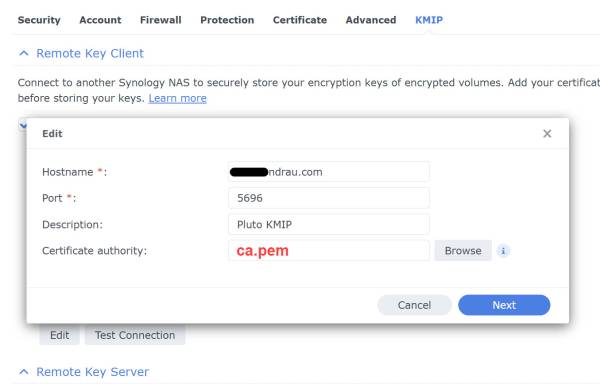
- Enter the server's IP address and port 5696
- Upload the certificate authority file
ca.pemand click Next. Wait until you see the connection is successful. - Now you need to go to Storage Manager –> Storage and click Global Settings. Scroll down to Encryption Key Vault and click Reset (important!) to make the switch to the KMIP Server permanent and move the encryption keys.
- Go to Control Panel –> Security –> KMIP, check Set as remote key client, and make sure your KMIP Server with uploaded Synology certificates is running (either Synology DSM, or PyKMIP on Debian, or a commercial KMIP Server)
- Enter the following credentials. Note that every time you edit the connection you need to upload the Certificate Authority file (ca.pem).

Rescue
- Read Rescue an encrypted volume to prepare the rescue if your KMIP Server get's unaccessible.